- Home
- All Kinds of Palms
- DIY Palm Crafts
- Draw Palm Tree
- Draw Palm Leaves
How to Draw Palm Leaves
Our How to Draw Palm Leaves step-by-step guide will teach you with easy steps. Even if you feel you have little drawing skills or experience.
Many people love a tropical paradise atmosphere. Palms give you that relaxing feeling of tropical beaches and delightful vacations. To capture that on paper, you've come to the right place, using our simple steps.
I myself have experience in drawing, even professionally, in a "former life" 🤔 But it's been my hobby since childhood. I took some step-by-step instruction via mail courses & at an art school. Then in my 30s, I became a sign painter.
Feeling overwhelmed by palm tree problems or confusing information?
You’re not alone. At Mission: Palm Trees, we help everyday palm lovers understand, grow, care for, and enjoy palms without puzzling jargon or exhausting research.
We Make Palm Tree Details Fun to Know
I'll work my experience into your lessons, helping you with essential basics. Finishing up with a satisfying drawing of palm tree leaves.
We hope this How to Draw Palm Leaves tutorial will spur on your creativity for even more artwork!
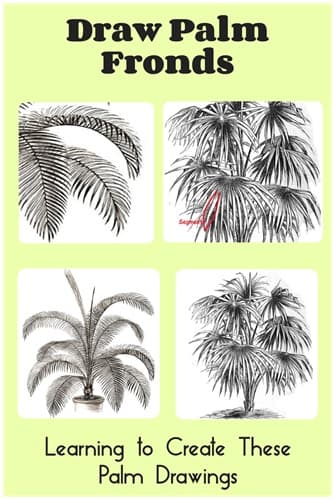
 Learning how to draw palm tree fronds.
Beginning Needs for Drawing Palm Leaves
The first step is to gather supplies. Like drawing pencils, a sketch pad, & a good eraser.
One great way to begin is with this useful tip - prepare in advance, by setting up an area with enough space to be comfortable. To ensure each step of our guide will be a fun time, not a chore!
FTC Disclosure: If you purchase via a link/ ad on this site, we may earn a small royalty. There's no added cost to you. Thanks much for any looks/ orders! Details>
Drawing Supplies You'll Need
Your next step is knowing about using artwork supplies, when learning how to draw palm leaves.
Drawing Pencils
It's helpful to have at least some varying Shades of Drawing Pencils. Different tones are created by the hardness or softness of the graphite. Soft pencil ratings create darker shades. Hard pencils are for lighter drawing of construction lines.
Your drawing pencils are labeled accordingly. Typically running from the hardest at 9H, to the softest at 9B.
Midrange pencils are (from hard to soft) H, F, HB & B. Those 4 pencils can do a fine job for drawing palm fronds.
For more effects, choose among all the grades. I'd suggest these three: 4H, HB & 5B. The exact center of hard to soft grades is HB. If you only want to have one drawing pencil, HB is the one to go with.
They come in Drawing Pencil Kits with ranges of hardness/softness. But you can always purchase individual drawing pencils.
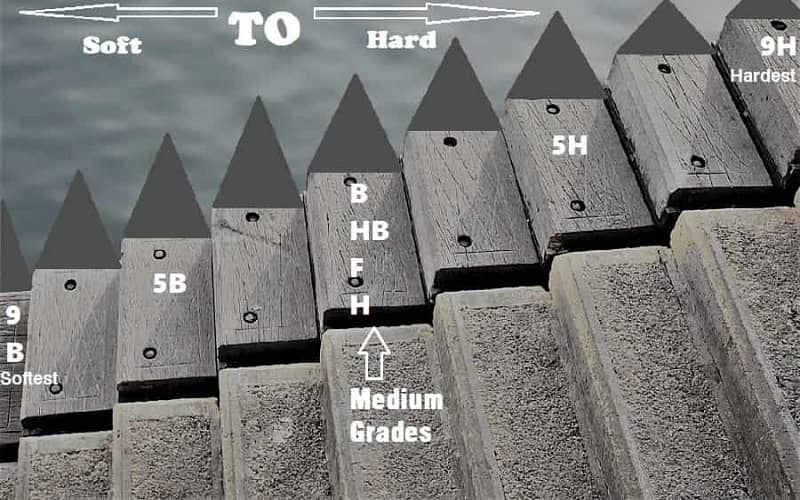 Stepping Up From Soft to Hard - Which is Suitable for Your Palm Frond Drawing?
Drawing Paper
Think of your paper's texture and sturdiness. Consider your drawing experience, when choosing the Best Paper for Your Artwork.
If you're a beginner, it's good to start with a Practice Drawing Pad. With relatively heavy paper, labeled between 50 to 70 lbs (22-31 kg). A Slightly Rough Paper surface is also recommended.
For those experienced with pencil drawing, we recommend even Heavier Paper for Artwork. Between 70 to 80 lbs (31-36 kg). Or even heavier.
When your practiced drawing skills are up for it, switch to smooth paper for a finished drawing.
Erasers
What's the best Artwork Eraser for techniques or correcting errors? (What?! There will possibly be errors! 😲) Most say to use a Kneaded Eraser. They don't create smudging or dust.
- A kneaded eraser lifts graphite off from your paper. Afterwards, it will look dirty. Then just "knead" it around, mushing dirty areas into clean. Ready for reuse.
- For creative effect, they're used to purposely smudge areas of pencil drawings.
- They can be molded to just hit specific areas. For erasing or art effects.
If you're aim is just dabbling. Mainly to have a fun time experimenting with how to draw palm leaves, This Kind of Eraser may be fine. I have this one & use it all the time. I'm quite happy with it.
Use a Reference Picture as a Model
Have your reference picture of a palm leaf in view as you're drawing. A real palm frond in front of you would be a bonus, adding to your visual understanding.
Understanding Your Drawing Model
First, best to see & understand the basic structure Of a Palm Leaf Here>. When doing a palm leaf drawing, think of what you'd like to have: a feather frond, or a fan frond. That makes a difference.
- Fan leaves typically have a thicker central stem (petiole). Starting at the palm tree trunk.
- Feather leaves have a longer central stem (petiole) starting from the trunk of a palm tree.
- Which reaches the leaflets growing at different angles on both sides of the stem (now the rachis).
Think about the structure of palm fronds as you draw.
Begin Learning How to Draw Palm Leaves
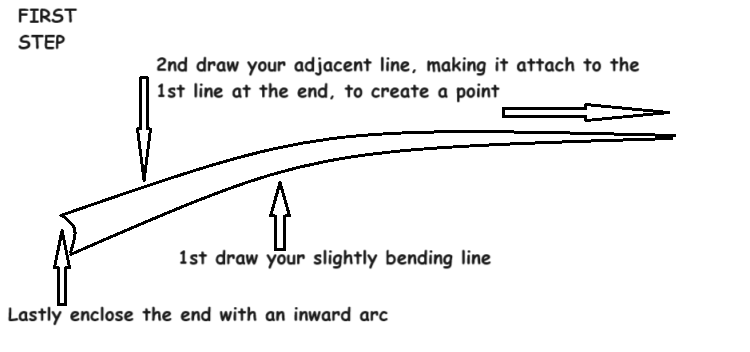
First Step of Our Guide to Begin Drawing the Leaf
The stem is the support for your palm leaf. Drawn with two curving horizontal lines.
- Make a long, slightly curved line in the middle of your paper.
- Then make another similar line next to the first, tapering it toward the first line.
- Have it meet the other line, at the end, forming a point.
- At the thicker width beginning, enclose it there with a line arcing inward.
Step Two - Draw the Frond Blade
The blade is the expanded leafy section of the frond. Feather leaves look quite different from a fan leaf. Draw your lines lightly at this stage, so you can easily erase and/or adjust.
Drawing Feather Leaves
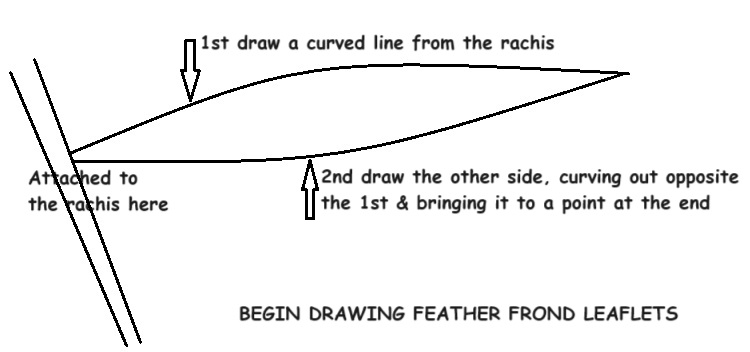
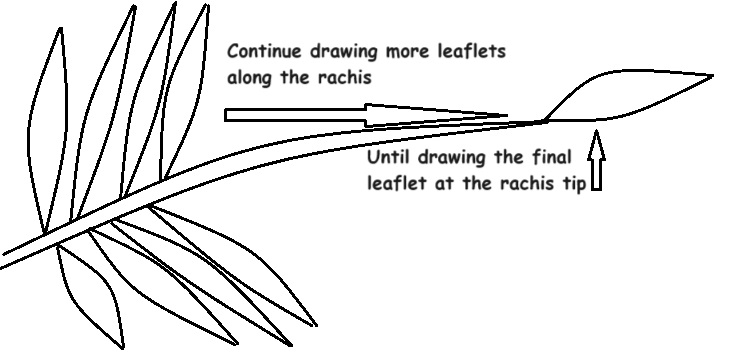
Adding leaflets. Start a few inches down from the stem's beginning.
- With light strokes, draw a curving horizontal line outwards from the stem. From the same starting point, draw another horizontal line. Make it curve out the opposite way.
- Have it attach at the the end point of the first line. Forming the leaflet tip.
Continue Adding More Leaflets
Repeat the process in the previous step to add more leaflets the same way. Draw leaflets on both sides of the central stem, working your way down.
Palm leaves are not perfectly symmetrical. Don't worry if your leaflets are at different angles. These slightly different directions make them look more natural.
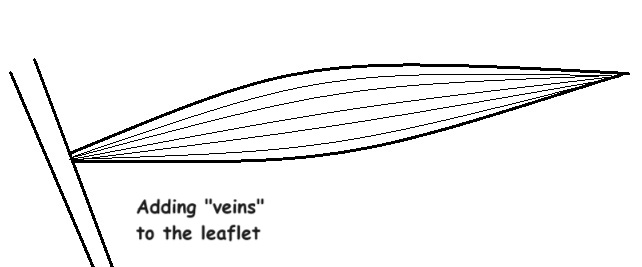
Add a Lot of Details
Draw several small parallel horizontal lines along the length of the leaflets. These are veins on the palm tree leaf. This gives your palm leaf a realistic texture.
An Optional, but Recommended, Final Step
For a realistic look, let's refine the edges of your leaflets. Palm leaves often have serrated edges. Erase the straight edges of your leaflets, replacing them with small leaf edge zigzag patterns. Do small areas at a time.
These final details add a satisfying level of reality to your drawing.
Drawing Fan Leaves
Fan palm tree leaves have segments with different depths into the blade.
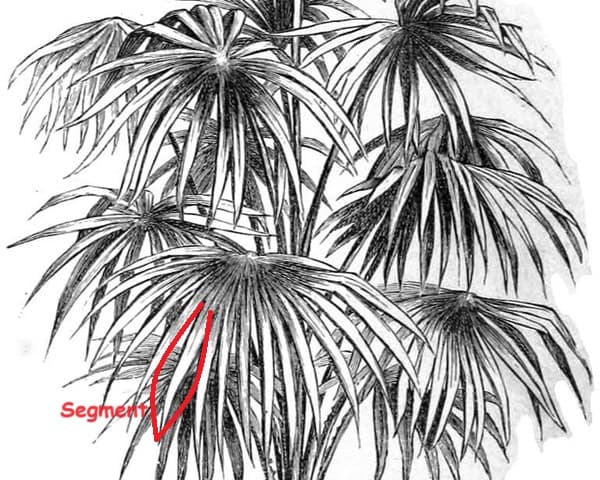 View Finished Fan Leaves for Modeling
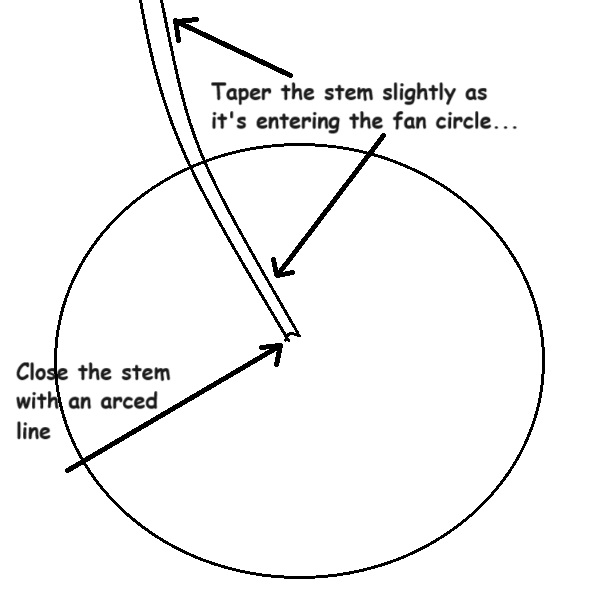
Start by drawing a large circle. Very light, because you'll be changing it.
Draw the stem (petiole) with a slightly curving line. Beginning near the center of the circle. Continue it past the circle's edge. Then draw a line for the stem's other side. As the lines exit the circle, gradually make this central stem a little wider.
Inside the circle close the stem with an arced line.
Most Fan Palm Species have divided edges called segments. Which vary in length.
Approximately midway out from the center, begin sketching narrow, thin tapering triangle-like shapes. Ending with a point near your circle's edge. These are the segments.
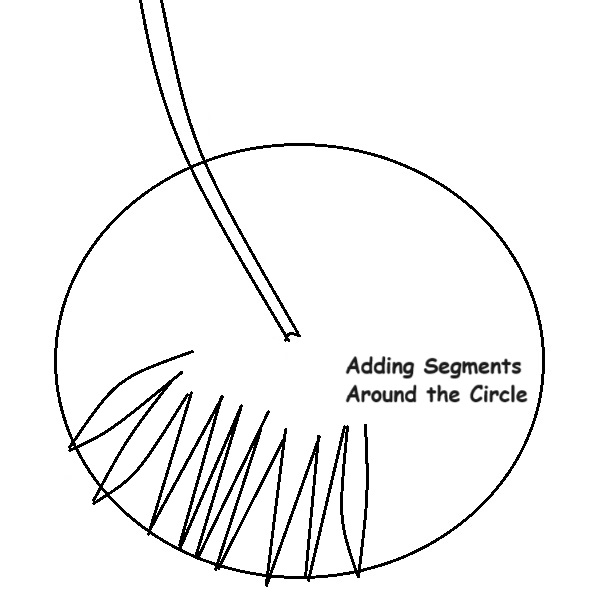
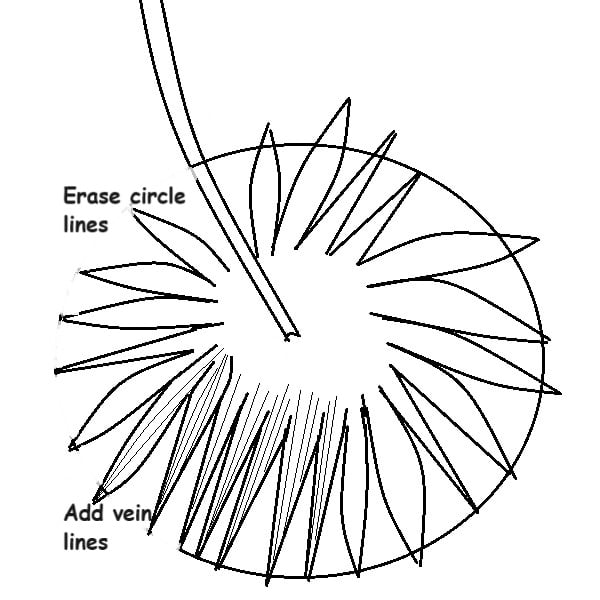
The next step is erasing the circle's edges between the points & inside the stem. Creating segments with a kind-of zig-zagged look.
Now add light parallel lines, for veins, as explained in the feather frond's previous step.
The Final Step for Both Feather & Fan Leaves
Get more realism with depth of a three-dimensional effect. Using a darker pencil, draw darker shades in areas between your lengthwise vein lines.
Swoop your pencil strokes from the central stem toward the leaflet/segment tip.
Here's help for Understanding Shading Techniques.
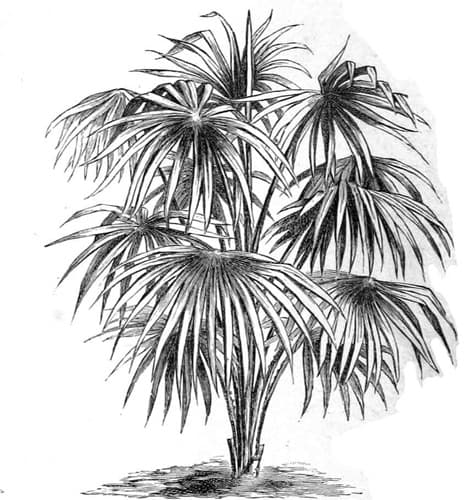 Observe the shading on this fan palm.
For both feather & fan leaves, choose several shadings:
- Draw darker shaded lines, leaving some intermittent white areas. Or shade it in completely.
- Use a harder pencil to create shades of gray in multiple areas.
- Using variably weighted strokes, shade in the entire stem. Similar to using crayons as a kid in coloring books.
Also try a mix/match for any of the above. Shading adds realism to the artsy appearance of the palm tree leaves.
Practicing & Finishing
Now that you know how to use drawing pencils to sketch palm leaves, why not draw an easy palm tree drawing? The whole palm tree!
You'd begin by outlining the palm tree trunk. Then attaching feather or fan leaves, as you're now good at that! 🤗 Drawing multiple palm leaves sprouting from around the top of the trunk.
Not as hard as it seems! Give it a shot, with This Drawing Assistance>
Remember, practice makes perfect! Even if your first few attempts don't turn out exactly as you'd hoped. Keep practicing, and soon you'll be able to create a beautiful palm tree leaf.
Takeaways for How to Draw Palm Leaves
There you have it! You've learned how to draw palm leaves. We hoped you've enjoyed this step-by-step guide.
Drawing is a wonderful way to relax, while expressing your creativity. It's a simple pastime that can bring lots of satisfaction. Plus, isn't it fun, learning something new?
Knowing how to draw palm leaves is your own personal accomplishment. Congratulations!
